> For the complete documentation index, see [llms.txt](https://support.tiger.com/llms.txt). Markdown versions of documentation pages are available by appending `.md` to page URLs; this page is available as [Markdown](https://support.tiger.com/english/connections/crypto-exchanges/bingx.md).
# BingX
{% hint style="success" %}
**Starting with version 7.3, the Tiger.com terminal includes support for the decentralized exchange BingX, featuring full spot trading functionality.**
{% endhint %}
{% stepper %}
{% step %}
### BingX Account Registration
To get started, go to the BingX website and create an account.
To get started, go to the BingX website and create an account.
On this screen, the user selects a registration method (email or phone), enters their details, accepts the terms, and clicks **"Sign Up"**
If a country selection window appears during registration, specify your country of residence and proceed with creating your account. You will also receive a code via email or to your phone number; to successfully complete registration, enter this code into the **"Security Verification"** window.
After registering, log in to your BingX account.
{% endstep %}
{% step %}
### Complete account verification
After logging into your BingX account, go to the **Identity Verification** section.
This screen displays the available verification level. To proceed, click **Verify Now.**
The **Advanced Verification** window will then open.
Here, you need to select:
* the document type;
* the country of issue.
After making your selection, click **Continue.**
At this stage, BingX will prompt you to complete document and identity verification. Follow the on-screen instructions to complete the process.
Once verification is successful, the status will change to **"Success"** in the verification section.
The screen displays the status of the successful completion of the identity verification.
{% endstep %}
{% step %}
### Connect Google Authenticator
You must link Google Authenticator before creating a BingX API key.
The system notifies you that Google Authenticator must be linked before creating an API key. Click **"Link Now".**
After that, the Google Authenticator connection screen will open.
At this stage, you need to download the Google Authenticator app to your phone. After installation, tap **Next.**
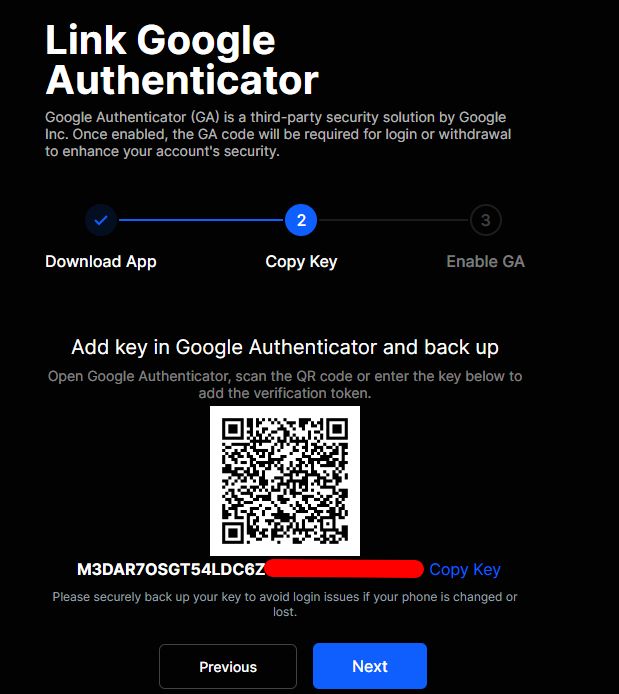
Here, you need to scan the QR code or save the key to add it to Google Authenticator. After adding it, click **Next.**
At this stage, BingX will ask for:
* an email code;
* a Google Authenticator code.
Enter both codes and click **Submit.**
Click **"Done"** after completing the setup.
> Important: When creating each new API key, BingX again requires an email verification code and a Google Authenticator code.
> {% endstep %}
{% step %}
### Go to API Management
After linking Google Authenticator, go to the API management section.
On this screen, you need to click **Create API.**
{% endstep %}
{% step %}
### Create an API key
After clicking the button to create an API, the key configuration window will open.
Here you need to:
* specify the API key name;
* select the access rights.
To connect to Tiger.com, select:
* **Read;**
* **Spot Trading.**
If you are not using IP restrictions, you can leave the **IP Address Whitelist** field blank. Once you have filled in the details, click **Confirm.**
{% endstep %}
{% step %}
### Confirm API key creation
After clicking **Confirm**, BingX may request security verification.
A confirmation code will be sent to this email address. Enter the code from the email and click **Confirm.**
Upon successful confirmation, the system will generate an API key and display a page with its details.
{% endstep %}
{% step %}
### Save the API Key and Secret Key
After creating the key, BingX will display the API details.
This screen displays:
* API Key;
* Secret Key.
Copy them immediately and save them in a secure place.
> Please note: **The Secret Key is displayed only once** and will not be available again after you close the page.
> {% endstep %}
{% step %}
### Connect BingX to Tiger.com
Now open the Tiger.com terminal and add a connection to BingX by going to **File → Connections → New Connection → Crypto Exchanges → BingX.**
At this stage, you need to:
1. Specify a connection name, e.g., **BingX** (optional);
2. Optionally, enable **"view-only" mode and skip entering API keys** (note that trading will not be permitted in this mode);
3. If "view-only" mode is disabled, enter the API keys from step 7:
1. **API Key;**
2. **API Secret.**
4. Select **"Not used"** in the **Proxy** field (optional);
5. Click the **"Connect to BingX"** button.
{% endstep %}
{% step %}
### Completing the connection
After a successful connection, the BingX exchange will appear in the list of available connections on Tiger.com.
At this stage, the connection is considered complete.
{% endstep %}
{% endstepper %}
---
# Agent Instructions
This documentation is published with GitBook. GitBook is the documentation platform designed so that both humans and AI agents can read, navigate, and reason over technical content effectively. Learn more at gitbook.com.
## Querying This Documentation
If you need additional information that is not directly available in this page, you can query the documentation by asking a question.
Perform an HTTP GET request on the following URL with the `ask` and `goal` query parameters:
```
GET https://support.tiger.com/english/connections/crypto-exchanges/bingx.md?ask=&goal=
```
`ask` is the immediate question: it should be specific, self-contained, and written in natural language.
`goal` is what the user is ultimately trying to achieve, the reason they need the answer. Sharing it helps GitBook give you a better, more relevant answer. A goal is most helpful when it describes the outcome the user wants rather than restating the question. For example, with `ask=how do I create an API token`, a goal like `automate deployments from our CI pipeline` lets GitBook tailor the answer to that use case.
The response will contain a direct answer to the question and relevant excerpts and sources from the documentation.
Use this mechanism when the answer is not explicitly present in the current page, you need clarification or additional context, or you want to retrieve related documentation sections.